Troubleshooting a Rogue DHCP Server
Network Security, Network Monitoring and Analysis, Network Configuration and Management, Switch Configuration, Troubleshooting
Contents
- Scenario
- Objectives
- Results
- 📄 Task 1: Set IP address pools for authorized server and rogue server
- 📄 Task 2: Enable network sniffer to track DHCP packets
- 📄 Task 3: Configure the PCs to obtain IP addresses via DHCP
- 📄 Task 4: Check sniffer DCHP packet captures
- 📄 Task 5: Enable DHCP snooping on the switch
- 📄 Task 6: Request a new IP address for PC1
Scenario
In this Packet Tracer lab, I will be identifying a rogue DHCP server in the network. Rogue DHCP servers can be used for malicious purposes, such as intercepting or redirecting network traffic, launching on-path attacks, or spreading malware.
To resolve this issue, I will enable DHCP snooping on the switch so that it only accepts DHCP traffic from the authorized DHCP server and not the rogue server. DHCP snooping is a security feature that filters and monitors DHCP messages, allowing only legitimate DHCP server responses and dropping any unauthorized or malicious DHCP traffic.
Also, a network sniffer device helps to identify the rogue server.
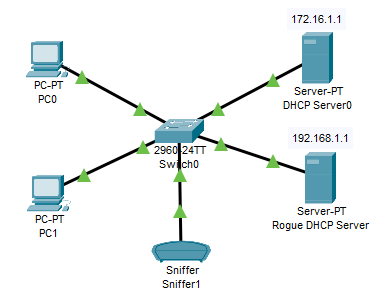
This is the network topology I will be using:
Objectives
- Set IP address pools for authorized server and rogue server
- Enable network sniffer to track DHCP packets
- Configure the PCs to obtain IP addresses via DHCP
- Check sniffer DCHP packet captures
- Enable DHCP snooping on the switch
- Request a new IP address for PC1
Results
📄 Task 1: Set IP address pools for authorized server and rogue server
To set up this lab, I will first configure the address pools both servers can allocate IP addresses from:


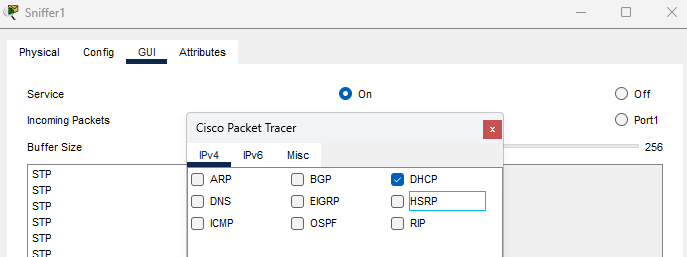
📄 Task 2: Enable network sniffer to track DHCP packets
I will configure the network sniffer device to track DHCP packets. It analyzes the captured packets to identify DHCP traffic and examine the details of DHCP messages, including the source and destination IP addresses, MAC addresses, and DHCP options. By examining the source IP address and MAC address of DHCP Offer and Acknowledgment messages, a network sniffer can help identify DHCP servers operating on the network.
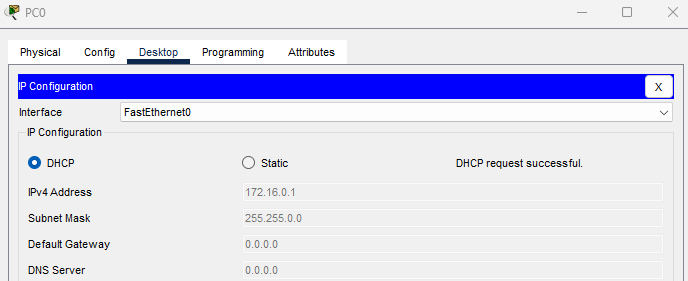
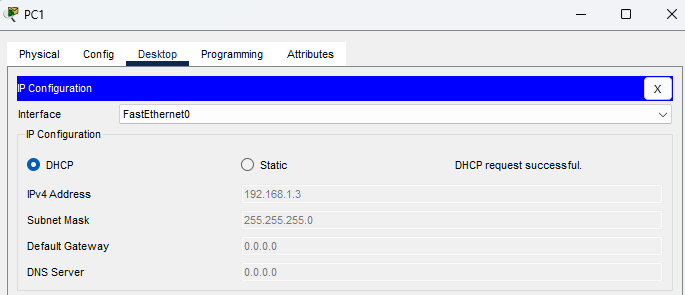
📄 Task 3: Configure the PCs to obtain IP addresses via DHCP
I will enable both PCs to obtain IP addresses via DHCP. PC0 is assigned an IP address (172.16.0.1) from the authorized server, however, PC1 is assigned an IP address (192.168.1.3) from the rogue server.
📄 Task 4: Check sniffer DCHP packet captures
In the sniffer packet captures, I can see the MAC addresses of both the authorized and rogue DHCP servers. As a network administrator, I would have a record of the MAC address of the authorized server so that I can compare it to any rogue servers on the network.
Authorized DHCP Server:  Rogue DHCP Server:
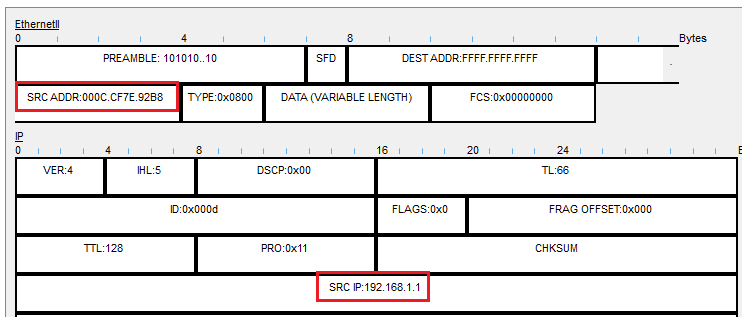
📄 Task 5: Enable DHCP snooping on the switch
To configure the switch so that it only accepts DHCP traffic from the authorized server, I will enable DHCP snooping on it:

To confirm DHCP snooping is enabled, I will try to renew the IP address on PC1.
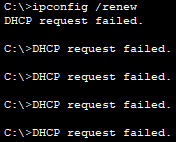
It fails because I have not set a trusted interface on the switch to receive DHCP packets. Since the F0/3 interface on the switch is linked to the authorized DHCP server, I will set it to trusted.

After setting interface F0/3 as trusted, all other switch interfaces that receive DHCP packets will drop those packets.
📄 Task 6: Request a new IP address for PC1
With DHCP snooping enabled on the switch, I will renew the IP address for PC1.
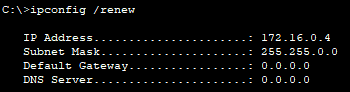
PC1 now receives an IP address from the authorized DHCP server, and not the rogue server.