Configuring SSH
Network Security, Router Configuration, SSH Configuration, Encryption, Troubleshooting
Contents
Scenario
In this Packet Tracer lab, I will enable SSH access between two Cisco router devices. SSH stands for Secure Shell. It’s a protocol that allows for secure remote access and communication between two devices over a network. SSH is important in cybersecurity because it provides several key benefits:
- Encryption: SSH encrypts all data transmitted during a session, making it unreadable to anyone snooping on the network. This protects sensitive information like passwords and commands.
- Strong Authentication: SSH offers multiple authentication methods, including passwords and public key cryptography. This makes it more difficult for unauthorized users to gain access to the system.
- Secure File Transfer: SSH can be used for secure file transfer between devices. This eliminates the risk of data breaches during file transfers.
Telnet, another protocol for remote access, is the precursor to SSH. However, unlike SSH, it does not provide any of the security benefits of SSH and should not be used.
This is the network topology I will be using:
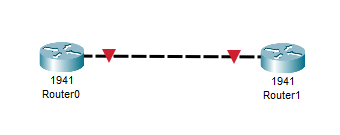
Note: To keep this lab simple, weak passwords are used.
Objectives
- Add static IP addresses to each router
- Configure SSH on Router1
- Attempt to connect to Router1 via SSH
- Attempt to connect to Router1 via Telnet
Results
📄 Task 1: Add static IP addresses to each router
I assign static IP addresses to each router so that they belong to same network:
- Router0: 192.168.1.1
- Router1: 192.168.1.2
- Subnet Mask: 255.255.255.0
I use the following commands:
R0(config)#interface g0/0
R0(config-if)#ip address 192.168.1.1 255.255.255.0
R0(config-if)#no shut
R1(config)#interface g0/0
R1(config-if)#ip address 192.168.1.2 255.255.255.0
R1(config-if)#no shut
Those commands allows me to configure the IP address for the Gigabit Ethernet 0/0 interface of each router. Then, the interface is activated with the “no shut” command.
To confirm connectivity, I make sure Router1 can ping Router0:

📄 Task 2: Configure SSH on Router1
In order for router R1 to accept SSH connections, SSH must be configured on it. I use the following commands:
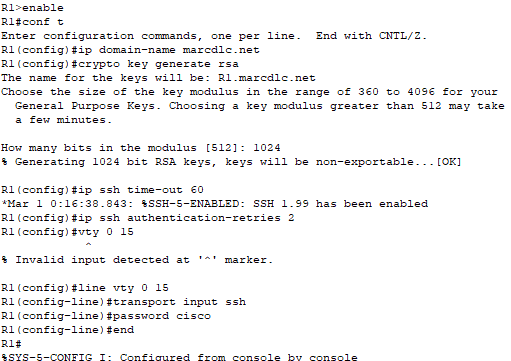
I assign a domain name to the router. I generate an RSA key pair for SSH authentication, which will also be used to encrypt communication during SSH sessions. The maximum idle time before an SSH sessions automatically terminated is set to 60 seconds. I also set the maximum SSH login attempts to 2. I then enter configuration mode for virtual terminal lines 0 through 15 and enable SSH access on all of them. The password is set to “cisco.”
📄 Task 3: Attempt to connect to Router1 via SSH
To verify that SSH has been configured correctly, I will connect to router R1 from router R0:
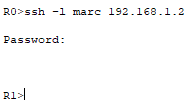
The connection is successful.
📄 Task 4: Attempt to connect to Router1 via Telnet
I attempt to connect to router R1 from router R0 using Telnet, but the connection fails. Router R1 is configured for SSH and listens for connections on port 22. It doesn’t actively listen for Telnet connections on port 23.
