Configuring a VLAN
Networking Fundamentals, Switch Configuration, Documentation and Planning, Segmentation, Network Security
Contents
Scenario
In this Packet Tracer Lab, I divide a simple network into two separate VLANs, configuring them so that they do not have access to each other. VLANs allow you to isolate sensitive data and critical systems from the rest of the network. For example, financial systems, HR databases, and other sensitive resources can be placed in their own VLANs, reducing the risk of unauthorized access. By segmenting the network, any security breach or attack can be contained within a specific VLAN. This limits the spread of malware, ransomware, or other malicious activities across the entire network.
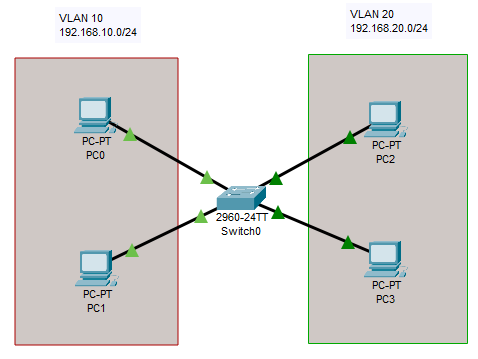
This is the network topology I will be using:
Objectives
- Divide the network into two VLANs
- Assign switch interfaces to the two VLANs
- Confirm that the switch interfaces are assigned to the correct VLANs
- Test that the VLANs do not have access to each other
- Rename the VLANs
Results
📄 Task 1: Divide the network into two VLANs
The two VLANs I will be using are 192.168.10.0/24 and 192.168.20.0/24. Two hosts will be asigned to each VLAN and will be given the following IP addresses:
- PC0: 192.168.10.1
- PC1: 192.168.10.2
- PC2: 192.168.20.1
- PC3: 192.168.20.2
📄 Task 2: Assign switch interfaces to the two VLANs
I access the CLI of the switch to configure its ports to be “access-only.” By configuring ports as access-only, I limit the potential for VLAN hopping attacks where an attacker might try to gain access to multiple VLANs through a single compromised port. Also, access ports are easier to monitor and manage since each port is tied to a single VLAN, making it easier to detect anomalies and unauthorized devices.
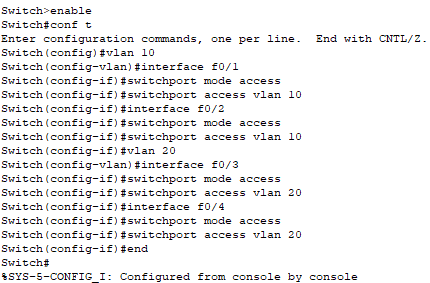
Interfaces Fa0/1 and Fa0/2 will link to VLAN 10, while interfaces Fa0/3 and Fa0/4 will link to VLAN 20.
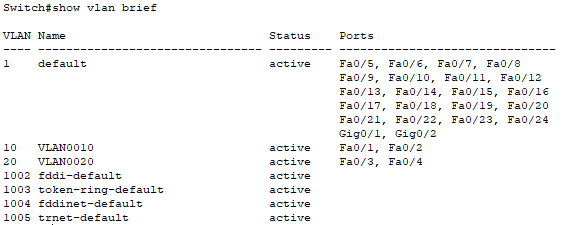
📄 Task 3: Confirm that the switch interfaces are assigned to the correct VLANs
I want to make sure that the switch interfaces are assigned to the correct VLANs. To do this, I use the command show vlan brief.
📄 Task 4: Test that the VLANs do not have access to each other
To test that the hosts in each VLAN do not have access to the other VLAN, I use the ping command to determine if a host can communicate with a host in another VLAN.
I ping from PC1 to the host within the same VLAN. Next, I ping a host in VLAN 20.
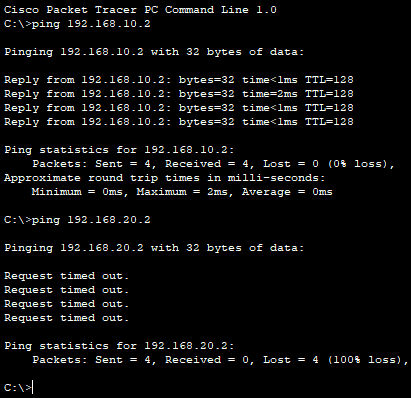
Pinging the host in VLAN 20 is unsuccessful, which indicates that the VLANs are isolated from one another.
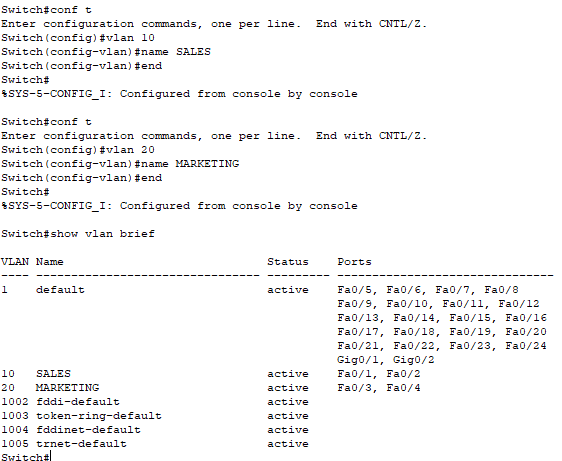
📄 Task 5: Rename the VLANs
In order to better organize the VLANs, it is good practice to name them according to what type of department the VLAN belongs to. As an example, I name one VLAN “SALES,” and the other VLAN “MARKETING”.